Blurring an image is one of those small editing tasks that appears simple at first, but it is useful in many real-world situations. You may want to hide a person’s face, protect private information, cover a license plate, remove sensitive text from a screenshot, or create a soft visual effect for a design project. Because of that, blur image in Python is a practical topic for developers, content creators, and anyone building photo tools. The same need also exists in everyday browsing, which is why many people search for blur faces or areas in photos online without installing software or learning advanced editing tools.
Python is a great choice for image blurring because it gives you flexibility. You can blur a complete image, select only part of an image, apply a Gaussian blur, pixelate a region, detect faces automatically, or create a batch tool that processes dozens or hundreds of photos at once. On the other hand, online tools are useful when you need something fast and simple. You upload a photo, mark the area to hide, adjust the blur strength, and download the edited result within seconds.
In this article, we will explore both sides in detail. First, we will understand what blur actually does in an image. Then we will build practical Python examples using popular libraries like Pillow and OpenCV. After that, we will discuss how to blur faces and custom areas, how to automate face detection, and how online blur tools work. By the end, you will have a clear understanding of how to blur images in Python and how to build or use an online face blurring workflow.
What does blurring an image mean?
Blurring is a visual effect that reduces detail in part or all of an image. Instead of showing sharp edges and fine texture, a blur spreads nearby pixels together so the image looks softer and less precise. In simple terms, blurring makes things harder to read or recognize.
There are several common reasons to blur an image:
A blurred background can make the main subject stand out.
A blurred face can protect privacy.
A blurred text field can hide passwords, emails, IDs, or order numbers.
A blurred object can remove visual clutter.
A blurred region can create a cinematic or artistic style.
Different blur methods produce different results. Some preserve shapes while softening details. Others destroy the original structure completely. The most common types are:
Gaussian blur, which creates a natural smooth blur.
Box blur, which averages neighboring pixels in a square area.
Median blur, which is helpful for reducing noise.
Motion blur, which simulates movement.
Pixelation, which is not technically blur, but is often used as a privacy effect.
For privacy-related use cases, Gaussian blur and pixelation are the most common options because they hide details effectively while still looking clean.
Why use Python for blurring images?
Python is one of the best languages for image processing because it is easy to read, widely supported, and packed with useful libraries. You do not need to write complicated code to get strong results. With just a few lines, you can load an image, choose an area, and apply a blur effect.
Python is especially useful when you need:
Batch processing of many images at once.
Custom blur areas based on coordinates or face detection.
Integration with web apps or APIs.
Automation inside dashboards, content moderation tools, or photo workflows.
Exporting results in multiple formats.
This is why developers often build photo-processing systems in Python first, then connect them to a website or online tool later. It gives them maximum control.
The most common Python libraries for blurring images
Two libraries are the standard choices for image blurring in Python.
Pillow
Pillow is the modern fork of the old PIL library. It is lightweight and easy to use. If you want basic blur effects or you are building a simple script, Pillow is often the fastest way to start.
It supports operations like resizing, cropping, filtering, and saving images in many formats.
OpenCV
OpenCV is a more powerful computer vision library. It is the better choice when you need advanced image processing, face detection, or video editing. If you want to blur faces automatically or blur selected regions in a webcam stream or uploaded photo, OpenCV is usually the right tool.
Pillow is simpler. OpenCV is more flexible. Many projects use both.
Blur an entire image in Python with Pillow
Let’s begin with the simplest case: applying a blur to the whole image.
from PIL import Image, ImageFilter

# Open the image
image = Image.open("input.jpg")

# Apply Gaussian blur
blurred = image.filter(ImageFilter.GaussianBlur(radius=10))

# Save the result
blurred.save("output_blurred.jpg")
This example uses a Gaussian blur with a radius of 10. A larger radius means a stronger blur. A smaller radius keeps more detail.
You can also use other filters:
from PIL import Image, ImageFilter

image = Image.open("input.jpg")

blurred_box = image.filter(ImageFilter.BoxBlur(5))
blurred_box.save("box_blur.jpg")

blurred_gaussian = image.filter(ImageFilter.GaussianBlur(8))
blurred_gaussian.save("gaussian_blur.jpg")
The difference between BoxBlur and GaussianBlur is subtle for small values, but Gaussian blur usually looks more natural.
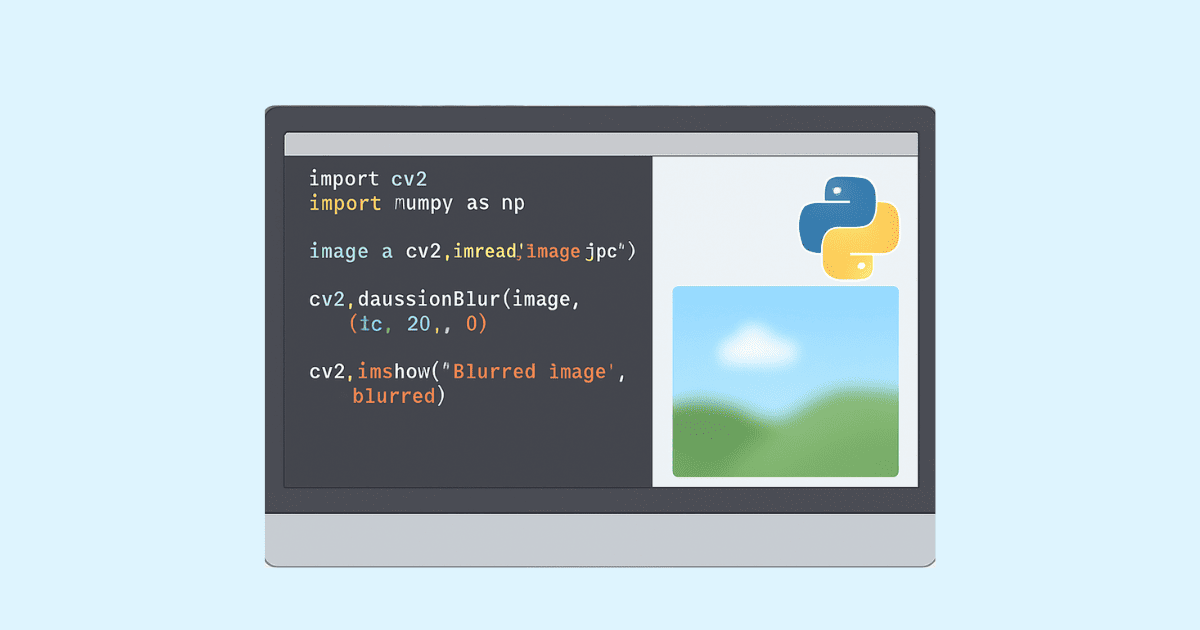
Blur an entire image in Python with OpenCV
OpenCV gives you another way to blur an image. It is especially useful if you plan to work with face detection or want more control over the image array.
import cv2

# Read image
image = cv2.imread("input.jpg")

# Apply Gaussian blur
blurred = cv2.GaussianBlur(image, (21, 21), 0)

# Save result
cv2.imwrite("output_blurred.jpg", blurred)
In this example, (21, 21) is the kernel size. It must be odd numbers. Larger values produce a stronger blur.
You can also use a median blur:
import cv2

image = cv2.imread("input.jpg")
blurred = cv2.medianBlur(image, 15)
cv2.imwrite("median_blur.jpg", blurred)
Median blur is often used for removing noise, but it can also be used as a visual blur effect.
Blur only part of an image
Most privacy and editing tasks do not require blurring the whole image. You may only want to hide a face, blur a name tag, obscure a screenshot section, or cover part of a background. That means you need region-based blurring.
The idea is simple:
Load the image.
Crop the area you want to blur.
Apply the blur effect only to that area.
Paste the blurred area back into the original image.
Blur a rectangular area with Pillow
from PIL import Image, ImageFilter

image = Image.open("input.jpg")

# Coordinates: left, top, right, bottom
box = (100, 80, 400, 300)

# Crop the selected area
region = image.crop(box)

# Blur the cropped region
blurred_region = region.filter(ImageFilter.GaussianBlur(radius=15))

# Paste it back
image.paste(blurred_region, box)

# Save result
image.save("output_region_blur.jpg")
This is one of the easiest ways to blur a specific part of an image.
Blur a rectangular area with OpenCV
import cv2

image = cv2.imread("input.jpg")

# Define the region
x1, y1, x2, y2 = 100, 80, 400, 300

# Crop the region
roi = image[y1:y2, x1:x2]

# Blur the region
blurred_roi = cv2.GaussianBlur(roi, (51, 51), 0)

# Paste back into the original image
image[y1:y2, x1:x2] = blurred_roi

cv2.imwrite("output_region_blur.jpg", image)
OpenCV uses array slicing, which makes it fast and efficient.
How to blur faces in Python automatically
Blurring faces is one of the most common privacy tasks. This is useful for user-generated content, public photo galleries, social media moderation, and legal or journalistic workflows where people’s identities must be protected.
To blur faces automatically, you usually need two steps:
Detect the face location.
Blur the detected face area.
OpenCV has built-in face detection models, and many people use Haar cascades for basic face detection. While not perfect, they are good enough for many beginner and intermediate projects.
Face blurring with OpenCV Haar cascade
import cv2

# Load the face detection model
face_cascade = cv2.CascadeClassifier(
    cv2.data.haarcascades + "haarcascade_frontalface_default.xml"
)

# Read image
image = cv2.imread("input.jpg")
gray = cv2.cvtColor(image, cv2.COLOR_BGR2GRAY)

# Detect faces
faces = face_cascade.detectMultiScale(
    gray,
    scaleFactor=1.1,
    minNeighbors=5,
    minSize=(30, 30)
)

# Blur each detected face
for (x, y, w, h) in faces:
    face_roi = image[y:y+h, x:x+w]
    blurred_face = cv2.GaussianBlur(face_roi, (99, 99), 30)
    image[y:y+h, x:x+w] = blurred_face

# Save the result
cv2.imwrite("faces_blurred.jpg", image)
This script detects faces in the image, loops through them, and applies a strong blur to each face.
What the detection parameters mean
scaleFactor controls how much the image size is reduced at each step.minNeighbors controls how many detections are required before a face is accepted.minSize sets the smallest face size to detect.
If your images have small faces, you may need to adjust these settings.
Blur faces with pixelation instead of blur
Sometimes pixelation is preferred because it looks more obviously anonymized.
import cv2

def pixelate_region(img, x, y, w, h, blocks=10):
    roi = img[y:y+h, x:x+w]
    temp = cv2.resize(roi, (blocks, blocks), interpolation=cv2.INTER_LINEAR)
    pixelated = cv2.resize(temp, (w, h), interpolation=cv2.INTER_NEAREST)
    img[y:y+h, x:x+w] = pixelated

image = cv2.imread("input.jpg")

face_cascade = cv2.CascadeClassifier(
    cv2.data.haarcascades + "haarcascade_frontalface_default.xml"
)
gray = cv2.cvtColor(image, cv2.COLOR_BGR2GRAY)
faces = face_cascade.detectMultiScale(gray, 1.1, 5)

for (x, y, w, h) in faces:
    pixelate_region(image, x, y, w, h, blocks=12)

cv2.imwrite("pixelated_faces.jpg", image)
This method works well when you need stronger anonymization.
How to blur custom areas in photos online
Not everyone wants to use Python code. Many people search for a fast online solution because it is easier and faster. An online blur tool usually works like this:
You upload an image.
You select one or more areas to hide.
You choose blur strength or pixelation.
You preview the result.
You download the edited image.
This is especially useful when you need to blur something quickly on a mobile device or when you do not want to install software.
Common online blur use cases
Hiding a person’s face in a photo.
Hiding a home address on a screenshot.
Hiding a credit card number or invoice details.
Hiding license plates.
Blurring sensitive background objects.
Creating a focus effect in a product photo.
Online tools are popular because they are simple and accessible. Many users prefer them for one-off tasks, while Python is better for repeatable automation and custom workflows.
How online blur tools usually work
Although each tool has its own design, most online blur editors follow the same logic.
First, the image is uploaded to the browser or server.
Then the tool lets you draw a box, brush over a region, or click face-detection suggestions.
After that, the selected area is blurred, pixelated, or masked.
Finally, the result is exported as JPG, PNG, or WebP.
A good online blur tool usually supports:
Manual selection of areas.
Face detection.
Multiple blur regions.
Blur strength control.
High-resolution output.
Fast downloads without watermarks.
If you are building such a tool, Python on the backend and a JavaScript frontend is a strong combination.
Building a simple blur tool in Python for a website
If you want to turn Python blur logic into an online photo tool, the easiest path is to create an API that receives an image and returns a processed version. The user uploads a file, chooses the blur area, and your server handles the rest.
A simple backend flow looks like this:
Upload image.
Receive blur coordinates.
Apply the blur with Pillow or OpenCV.
Return the edited file for download.
Here is an example using Flask and Pillow:
from flask import Flask, request, send_file
from PIL import Image, ImageFilter
import io

app = Flask(__name__)

@app.route("/blur", methods=["POST"])
def blur_image():
    file = request.files["image"]
    left = int(request.form.get("left", 0))
    top = int(request.form.get("top", 0))
    right = int(request.form.get("right", 100))
    bottom = int(request.form.get("bottom", 100))
    radius = int(request.form.get("radius", 10))

    image = Image.open(file).convert("RGB")

    box = (left, top, right, bottom)
    region = image.crop(box)
    blurred_region = region.filter(ImageFilter.GaussianBlur(radius=radius))
    image.paste(blurred_region, box)

    output = io.BytesIO()
    image.save(output, format="JPEG")
    output.seek(0)

    return send_file(output, mimetype="image/jpeg", as_attachment=True, download_name="blurred.jpg")

if __name__ == "__main__":
    app.run(debug=True)
This is a very simple example, but it shows the core idea behind many online blur services.
Blur faces in uploaded images on a website
If your online tool needs automatic face blur, you can combine image upload with face detection.
A possible flow is:
The user uploads a photo.
Your Python backend loads the image.
The backend detects faces.
Each face area is blurred.
The result is shown in the browser.
That workflow is useful for privacy apps, moderation tools, and content automation services.
Here is a compact example:
from PIL import Image, ImageFilter
import cv2
import numpy as np

def blur_faces_pil(image_path, output_path):
    pil_img = Image.open(image_path).convert("RGB")
    cv_img = cv2.cvtColor(np.array(pil_img), cv2.COLOR_RGB2BGR)

    face_cascade = cv2.CascadeClassifier(
        cv2.data.haarcascades + "haarcascade_frontalface_default.xml"
    )
    gray = cv2.cvtColor(cv_img, cv2.COLOR_BGR2GRAY)
    faces = face_cascade.detectMultiScale(gray, 1.1, 5)

    for (x, y, w, h) in faces:
        face = pil_img.crop((x, y, x + w, y + h))
        blurred = face.filter(ImageFilter.GaussianBlur(radius=20))
        pil_img.paste(blurred, (x, y, x + w, y + h))

    pil_img.save(output_path)

blur_faces_pil("input.jpg", "output.jpg")
This version mixes OpenCV for detection and Pillow for the blur operation. That is a very practical approach.
Blur multiple faces or multiple areas at once
Real images often contain several sensitive spots. You may need to blur a face, a logo, a document number, and a background object in the same photo. Python makes this simple because you can store multiple regions in a list and process them in a loop.
from PIL import Image, ImageFilter

image = Image.open("input.jpg")

regions = [
    (50, 60, 200, 220),
    (300, 100, 460, 260),
    (500, 150, 620, 300)
]

for box in regions:
    region = image.crop(box)
    blurred = region.filter(ImageFilter.GaussianBlur(radius=18))
    image.paste(blurred, box)

image.save("multiple_blurs.jpg")
This pattern is ideal for image annotation workflows and review systems.
Blur image backgrounds while keeping the subject sharp
Sometimes the goal is not privacy. Instead, you may want an artistic portrait effect where the subject stays sharp and the background is blurred. This is a popular style in product photography and social media content.
To do this properly, you need subject segmentation or a foreground mask. Once you know which pixels belong to the subject, you blur only the background.
A simple version can be done manually:
Detect the main object.
Create a mask.
Blur the whole image.
Copy the sharp subject back on top.
This is more advanced than a simple rectangle blur, but it is one of the most useful editing techniques for modern photo apps.
Blur text in screenshots
Screenshots often contain sensitive data. This may include emails, phone numbers, account details, tokens, order numbers, or other private information. A blur tool can protect that data before the screenshot is shared online.
The process is the same as region blur:
Identify the text area.
Crop or select it.
Apply blur or pixelation.
Save the result.
When privacy matters, pixelation is often stronger than blur because it removes readability more aggressively.
Blur vs pixelate: which one should you use?
Blur and pixelation are both used to hide information, but they are not exactly the same.
Blur softens details and looks more natural.
Pixelation creates visible blocks and makes the hidden area obvious.
Blur is better for aesthetics.
Pixelation is better when you want the censoring effect to be unmistakable.
For a clean photo editor, blur is usually preferred.
For privacy and moderation, pixelation can be more secure-looking.
Choosing the right blur strength
The best blur strength depends on the use case.
For background blur, a light or medium blur usually looks best.
For faces, you may need a stronger blur so the identity cannot be recognized.
For sensitive text, strong blur or pixelation is recommended.
For artistic effects, experiment until the image looks balanced.
In Pillow, the radius value controls blur strength.
In OpenCV, the kernel size and sigma value influence the final result.
A useful rule is this: the smaller the sensitive object, the stronger the blur should be.
Batch blur images with Python
One of Python’s biggest advantages is automation. If you need to blur 500 photos, doing it manually online would take a long time. A Python script can process the whole folder in seconds or minutes.
from PIL import Image, ImageFilter
import os

input_folder = "photos"
output_folder = "blurred_photos"
os.makedirs(output_folder, exist_ok=True)

for filename in os.listdir(input_folder):
    if filename.lower().endswith((".jpg", ".jpeg", ".png", ".webp")):
        path = os.path.join(input_folder, filename)
        image = Image.open(path)
        blurred = image.filter(ImageFilter.GaussianBlur(radius=12))
        blurred.save(os.path.join(output_folder, filename))
You can expand this idea to blur only selected regions, detect faces automatically, or process images from a cloud bucket or CMS.
Practical examples where image blur is useful
Image blur is not just a coding exercise. It is used everywhere.
Social media apps blur private photos.
Newsrooms blur faces of minors or bystanders.
Businesses blur confidential documents in shared screenshots.
E-commerce teams blur background clutter in product photography.
Security teams blur sensitive assets in reports.
Developers build moderation pipelines using blur detection.
Designers use blur effects to create depth and focus.
Because of this, blur tools are often hidden inside larger systems such as chat apps, document workflows, or admin dashboards.
Making a blur tool more user friendly
If you are building a blur image online tool, usability matters a lot. People expect the process to be fast and intuitive. A good experience usually includes:
Drag-and-drop upload.
Live preview.
Easy shape drawing for blur areas.
Face auto-detection buttons.
Undo and redo.
Export in high quality.
Support for mobile screens.
Clear privacy messaging.
Users do not want to think about coordinates or file formats. They just want to hide something and move on.
Important privacy considerations
Blurring is useful, but it is not magic. A weak blur may still leave enough clues for someone to guess what was hidden. This is especially true for faces, license plates, and text.
For stronger privacy protection:
Use a strong blur radius.
Consider pixelation when appropriate.
Cover the full object, not just the center.
Check the result at full size before publishing.
Avoid compressing the final image too much if the hidden area must remain unreadable.
If you are developing a public tool, make sure the privacy model is clear. Users should know whether uploads are stored, processed locally, or removed automatically.
Common mistakes when blurring images in Python
A few common issues appear again and again in beginner projects.
Using the wrong image coordinates.
Forgetting that OpenCV uses BGR while Pillow uses RGB.
Applying too small of a blur radius.
Blurring the face but leaving hair or part of the head visible.
Saving with the wrong format or quality settings.
Not checking whether the face detection found all faces.
Assuming every image has the same size.
These problems are easy to fix once you understand how the libraries work.
Example: robust blur of selected face regions
Here is a more complete example that uses OpenCV to detect faces and Pillow to blur them with a strong effect.
from PIL import Image, ImageFilter
import cv2
import numpy as np

def blur_detected_faces(input_path, output_path, blur_radius=25):
    # Load with Pillow
    pil_image = Image.open(input_path).convert("RGB")

    # Convert to OpenCV format for detection
    cv_image = cv2.cvtColor(np.array(pil_image), cv2.COLOR_RGB2BGR)
    gray = cv2.cvtColor(cv_image, cv2.COLOR_BGR2GRAY)

    # Face detection
    face_cascade = cv2.CascadeClassifier(
        cv2.data.haarcascades + "haarcascade_frontalface_default.xml"
    )
    faces = face_cascade.detectMultiScale(
        gray,
        scaleFactor=1.1,
        minNeighbors=5,
        minSize=(40, 40)
    )

    # Blur each face
    for (x, y, w, h) in faces:
        # Add a small margin around the face
        margin_x = int(w * 0.15)
        margin_y = int(h * 0.20)

        left = max(x - margin_x, 0)
        top = max(y - margin_y, 0)
        right = min(x + w + margin_x, pil_image.width)
        bottom = min(y + h + margin_y, pil_image.height)

        region = pil_image.crop((left, top, right, bottom))
        blurred = region.filter(ImageFilter.GaussianBlur(radius=blur_radius))
        pil_image.paste(blurred, (left, top, right, bottom))

    pil_image.save(output_path)

blur_detected_faces("input.jpg", "faces_blurred.jpg")
This version adds a margin around the face so the blur covers more than just the strict bounding box. That makes the result more reliable for privacy.
Example: blur custom areas from coordinates
Sometimes a website user chooses the blur areas manually. In that case, your Python code may receive coordinates from a form or JSON payload. Here is a simple example that applies blur to a list of rectangles.
from PIL import Image, ImageFilter

def blur_regions(input_path, output_path, regions, radius=20):
    image = Image.open(input_path).convert("RGB")

    for left, top, right, bottom in regions:
        left = max(0, left)
        top = max(0, top)
        right = min(image.width, right)
        bottom = min(image.height, bottom)

        if right <= left or bottom <= top:
            continue

        region = image.crop((left, top, right, bottom))
        blurred = region.filter(ImageFilter.GaussianBlur(radius=radius))
        image.paste(blurred, (left, top, right, bottom))

    image.save(output_path)

regions = [
    (120, 80, 280, 220),
    (350, 150, 500, 300)
]

blur_regions("input.jpg", "custom_blur.jpg", regions)
This is a flexible pattern for any online editing tool.
How to create a blur preview in a browser app
For a real online tool, users usually expect to see the effect before downloading the file. A common approach is:
The browser sends the selected area coordinates to the backend.
The backend returns the blurred image or a preview version.
The frontend displays the preview immediately.
The user confirms the result and downloads it.
This gives a smooth experience and makes the tool feel fast and modern.
Performance tips for blur processing
If you are processing a lot of images, a few small optimizations can help.
Resize large images before previewing.
Use efficient libraries like OpenCV.
Avoid unnecessary conversions between image formats.
Process only the selected region instead of the full image when possible.
Use background workers for batch jobs in web apps.
Cache thumbnails and previews separately from final exports.
For most apps, blurring is not computationally expensive, but face detection and large images can increase processing time.
Best practices for blur image tools
A good blur tool should be accurate, simple, and reliable. Whether you are writing Python code or building an online editor, these best practices help a lot:
Make blur controls easy to understand.
Provide both blur and pixelation options.
Support manual selection and automatic detection.
Check that hidden content is fully covered.
Preserve image quality on export.
Handle different file formats correctly.
Keep the interface clean and fast.
These details matter because users often rely on blur tools for privacy, not just aesthetics.
When to use Python and when to use an online blur tool
Python is best when you need automation, customization, or batch processing. It is also ideal for developers building their own product or integrating blur into a web app.
An online tool is best when you need speed, convenience, and no setup. It is perfect for occasional use or for users who do not want to code.
In many cases, the best solution is to combine both. Python powers the backend, while the browser provides the user interface. That way, you get the simplicity of an online tool and the control of custom code.
Final thoughts
Blurring images is a simple task with surprisingly broad use cases. In Python, you can blur an entire photo, blur a selected rectangle, blur faces automatically, blur text in screenshots, or batch-process many files at once. With Pillow and OpenCV, you have everything you need to build a powerful and flexible blur workflow. At the same time, online blur tools offer a fast, easy way to hide faces or areas in photos without installing anything.
If your goal is privacy, make sure the blur is strong enough and covers the entire sensitive area. If your goal is aesthetics, experiment with blur strength until the image looks natural. And if your goal is to build a tool, Python gives you a strong foundation for turning a basic blur function into a polished online product.
Blur may look like a small feature, but in the right context it becomes essential. It protects privacy, improves visuals, and powers many of the tools people use every day.
Hassan Agmir
Author · Filenewer
Writing about file tools and automation at Filenewer.
Try It Free
Process your files right now
No account needed · Fast & secure · 100% free
Browse All Tools